How to Use New Gmail Add-Ons to Enhance Your Productivity


Raise your hand if you are tired of spending too much time on inserting images, attaching documents, and pasting data from another app or directly from your computer or mobile device in an email? Then you are not alone many of the users spend more time, on attaching files to an email, than they like. Now Google is looking to speed up the process for you by introducing some new feature and add-ons.
These new things are meant to speed up the process of attaching files and make it a lot easier for the people who spend a lot of time searching Dropbox files and copying and pasting links which is a bit old fashion. Now with the new Compose Action, you can do all these tasks with a little fuss by using Chrome Extensions right from Gmail message draft.
There are a variety of Compose Actions in Gmail add-ons, that come from Google Chrome Extensions that you can download right from your browser. Right now, four Extensions are available for all Gmail users including, DropBox, Box, Egnyte, and Atlassian.
First of allinstall the Dropbox for Gmail Chrome Extension and from there click on Add to Chrome and the extension will be added to the Chrome, the installation won't take too much time.

How to Use New Gmail Add-Ons to Enhance Your Productivity


Next head over to Gmail and open up a new message and if you are using this extension for the first time you will see a screen notifying you of Dropbox Extension. Now click on the get started and sign up or sign in to Dropbox on the next window.

How to Use New Gmail Add-Ons to Enhance Your Productivity


Once you sign in you'll see the list of available files that you can attach with your Email by just checking a box near to that file and clicking on choose. After clicking on Choose your file will be added to the draft and that's it you are done now you can compose your message and send it.
How to Use New Gmail Add-Ons to Enhance Your Productivity


And in future, if you want to access the Dropbox all you have to do is just click on the small Dropbox icon in the line up of other Email formatting tools.

Similarly, you can use the other Extension to attach the files from like the services of Box, Atlassian, and Egnyte. All of these new compose actions can be found via G Suit Marketplace, and Google is saying there are more coming soon.

Source: Google Blog

How to Enable Dark Mode on YouTube Android App


I assume that you have heard about a rumor that YouTube is testing Dark Mode on web browsers. You can simply shift to dark mode on your browser by clicking on the Profile icon and selecting Dark Theme from the drop-down menu. But guess what YouTube has rolled out this new feature for its Android app as well.
Until now I was using a moded version of Youtube app call YouTube Vance an alternative to Youtube to use dark mode and playing videos in the background. But now I'm shifting towards official Youtube app as it has dark mode enabling option by default.
So let's move over to enabling Dark mode on Youtube Android App, first you have to have auto updates enabled to do this open up the play store app, search for the Youtube app there you will see an update button o if you don't see that button then you might already have auto update enabled and you already have the latest Youtube app installed. To see what version you are using just long press on the Youtube app and an option will pop-up saying App Info just tab on it this will show you the application version that you are currently using. Dark mode is enabled on 13.35.51 or newer versions.


Next to enable the Dark mode on the Youtube app tab on your profile picture on the top right corner and select settings and from settings tap on the General.


From the next screen select on the Dark theme, it should be the 2nd option from the list.


That's it you will see all the interface of the Youtube app is turned dark. It also works flawlessly on both Portrait and Landscape mode.


What If Dark Mode Option Don't Show?


If you don't see Dark mode option in the settings even after updating the Youtube app then you might wanna restart the app or even Force stop the app from application manager and it should work.  

6 useful Google Chrome Developer Tools Tips & Tricks


You might be aware of the well known Google Chrome feature called Chrome Developer Tools. While it's true that it is very useful for the web developers, but there are many useful hacks that are quite handy for average internet surfer. Here, in this article, I'm going to show you some of the useful features or tips for the average international users like me...

How to Open Developer Tools in Chrome?

To open Developer Tools in Google Chrome click on the three-dot (⋮) > More Tools > Developer Tools. You can also Right Click on any page that you want to edit and from the menu click on Inspect also you can use the keyboard shortcut (Ctrl + Shift + I) on Windows PC or (Command + Option + I) for Mac.
By default, it will open Developer Tools window on the right side of the browser but you can change its position. To move the Developer Tools window at the bottom or towards the left side just click on the three-dot (⋮) menu in  Developer Tools window and select whatever position you like, you can also turn on the Dark mode as this make it easier for the eyes of the user.
how to open 5 Google Chrome Developer Tools

1. Edit a Web Page

I know this is the most used Developer tools trick but this has to be added to this list as it allows you to edit any web page that you want. To do this just open any web page that you want to edit on Chrome and right- click and from the menu choose Inspect Element. Now go to the console tab and paste the following line of code and hit enter.

document.body.contentEditable = true

This will make the entire page editable like any word or text document. Now on the Page just click anywhere and start typing. Remember this effect will be gone once you refresh the page. So, make sure you get a screenshot of your edited page before closing refreshing it.
How edit a web page

2. Edit an HTML Element

You can edit an HTML on the preview changes by selecting any element that you want to edit, choosing a DOM element within the panel, and double-clicking on the opening tag to edit it. The closing tags will be automatically updated for you. Any Changes will show up in your browser as if the change had actually been made to the source code.

3. Reveal the saved Passwords in Chrome Browser.

Say you want to login Instagram, Facebook, or Gmail on your mobile, but you don't remember the password but fortunately, you have it saved in your web browser. Now, instead of going through the exhausting process of password reset, you can simply use the developer tools to get that saved password.
All you have to do is Right-Click on the password field and then choose "Inspect Element". This will open the developer tools window all you have to do is replace the word "password" with "text" in the password-type input field. This will reveal the password.
How to reveal saved password

4. Change Website to the Mobile Layout.

For example, if you want to check if your website is responsive or not. Or you want to upload pictures right from your pc as you have edited them on Photoshop but can't do this on the regular desktop version of Instagram. Fortunately, you can do this by using Developer tools.
To do this, fire up the Chrome Development tools, Click on 3 vertical dots, and under more Tools select Network conditions. There uncheck the box that says, User agent, select automatically and from the popup box select a Mobile Browser. If you are trying to access a govt website select a different compatible browser. Now close the window and refresh the page. As you can see, there is a full function upload button, which you can use to upload pictures to Instagram from the computer.
mobile layout

5. Change Your Browser GPS Location.

Any website that you are browsing finds out from where you are browsing also your IP address and your browser's location. Well, you can easily change your IP address by using VPN or smart DNS but it's not easy to change your browser location.
To fix that, open Developer Console, by right-clicking on the screen. At the bottom of the panel, press the three-dot button on the top right, and then click the “Sensors” option from More. A new window will open in the bottom half of the developer tools window, Under Geolocation, select “Custom location.” Now put in your location based on latitude and longitude, if you don’t know these values, you can always use Google maps. Or just select the name of the city like California. Now, Reload the page, allow location data in the pop-up window.  And now if I refresh the page, and click on allow location, as you can see, I’m now able to stream local stations. 
change browser location using Google Chrome Developer

6. Use the Native Color Picker

I’m a sucker for minimal colors and more often than not, I’m scrolling minimal images on Google to get inspiration for features images and thumbnails. Or say, if a particular website’s color scheme that catches your eye, and wants to find out what color they are using, well you can always install a color picker extension. But there is a faster way to do it.
Bring up the Chrome Development tools, in the left side click on Style tab, click on the small box next to the color. This will bring up Color picker tool, now, click on anywhere on the webpage, whose color you want to find out and the color picker will give you the hex code. Simply copy the hex code and paste it in Photoshop.
Color Picker tool using Google Chrome Developer Tools

How do you use Chrome Developer tool?

Overall, the developer tools have more use cases than messing around with your fav websites. In short, anything that the website is not doing on the server side can be altered with Chrome developer tools. Alternatively, you can use Web Developer extension to get one-click access to all the features and more.  

How to Clean C Drive in Windows 10 (Make Your PC Faster)

How to Clean C Drive in Windows 10

The all-important “C” drive is the core of the PC, where the operating system is installed, and all the crucial system files are kept. Inevitably, this is also the drive that gets filled up most easily due to endless Windows updates, downloaded files that you forget about, and the fact that by default everything saves to the “C” drive.
Today I gonna show you how to clean up "C drive" or "Local Disc C" in your Windows 10 to make your PC run faster. It's a simple procedure but very effective, we are not using any third party software during this cleaning process so you don't have to download any of those programs.
For your information cleaning the unwanted files from your PC's "C” drive or "Local Disc C” will make your Windows 10 run much faster.
Let's start:

Cleaning


  • From your Keyboard press Windows key + R in order to open Run command, and type temp and hit Ok.
How to Clean C Drive In Windows 10 (Make Your PC Faster)

  • It will open a new window where you have to give it admin permission to open it so click on Continue.
How to Clean C Drive In Windows 10 (Make Your PC Faster)

  • This opens a folder here you have select all the entities and press Shift + Delete to delete those files.
How to Clean C Drive In Windows 10 (Make Your PC Faster)

  • Some files cannot be deleted so Skip them.
How to Clean C Drive In Windows 10 (Make Your PC Faster)

  • Now open the Run command again and type %temp% then hit Ok. This will open a new window repeat the same procedure as you have done before.
How to Clean C Drive In Windows 10 (Make Your PC Faster)

  • Now again open up the Run command for one last time and type prefetch and hit Ok this will open a new folder again you have to grant it permission then select all the files and delete them like you did previously.
How to Clean C Drive In Windows 10 (Make Your PC Faster)

How to Clean C Drive In Windows 10 (Make Your PC Faster)


Recycle Bin

 You may know already but I have to tell you whenever you delete something by right click delete option or by simply pressing the Delete button from your keyboard that thing is thrown to recycle bin for a certain limit and for Windows 10 that limit is 50GB's, so the recycle bin is using your "C” drive space until you don't empty it.
 To do so simply right click on the recycle bin icon and press Empty Recycle Bin from the drop-down menu.
How to Clean C Drive In Windows 10 (Make Your PC Faster)


Uninstall

Sometimes you install a program for your one time use then you don't use it again this also takes space from you "C" drive so, head over to Windows 10 search bar and type Add or Remove Programs and hit enter.
How to Clean C Drive In Windows 10 (Make Your PC Faster)

This will open new Window Apps & Features so come down and uninstall the unwanted programs.
How to Clean C Drive In Windows 10 (Make Your PC Faster)


Optimize "C” Drive

Open the file explorer and right click on on "C" drive and click on the properties from the drop-down menu.
How to Clean C Drive In Windows 10 (Make Your PC Faster)

Now click on the Tools from the properties window and click on Optimize.
How to Clean C Drive In Windows 10 (Make Your PC Faster)

It will open a new window select "C" drive and click on Optimize and that pretty much we can do here.
How to Clean C Drive In Windows 10 (Make Your PC Faster)

Disc Clean up

Open the file explorer and right click on on "C" drive and click on the properties from the drop-down menu.
How to Clean C Drive In Windows 10 (Make Your PC Faster)

Here click on Disc Cleanup.
How to Clean C Drive In Windows 10 (Make Your PC Faster)

It will open a new window from here click on Cleanup System Files.
How to Clean C Drive In Windows 10 (Make Your PC Faster)

After calculation, a window will appear to select the files you want to delete and hit Ok.
How to Clean C Drive In Windows 10 (Make Your PC Faster)


Conclusion

It's good to go through this routine every now and then, but it’s advisable to make sure it doesn’t fill up in the first place.

One of my favorite tricks in this respect is changing the default destination of the “Pictures,” “Documents,” “Music” and “Video” folders to a secondary hard drive. (Just right-click them, go to Properties, then the Location tab.) Happy cleaning!

How to stop Windows 10 driver updates


Automatic update of Windows 10 is a convenient way that a system remains updated whether it's Security Patches, updates for Microsoft Products or the device drivers.
Although drivers available through these updates work fine like a charm but sometimes getting device drivers updates can automatically cause issues on specific hardware configurations.
In this Windows 10 guide, I'll walk you through step by step to disable these automatic updates including these drivers updates as well.

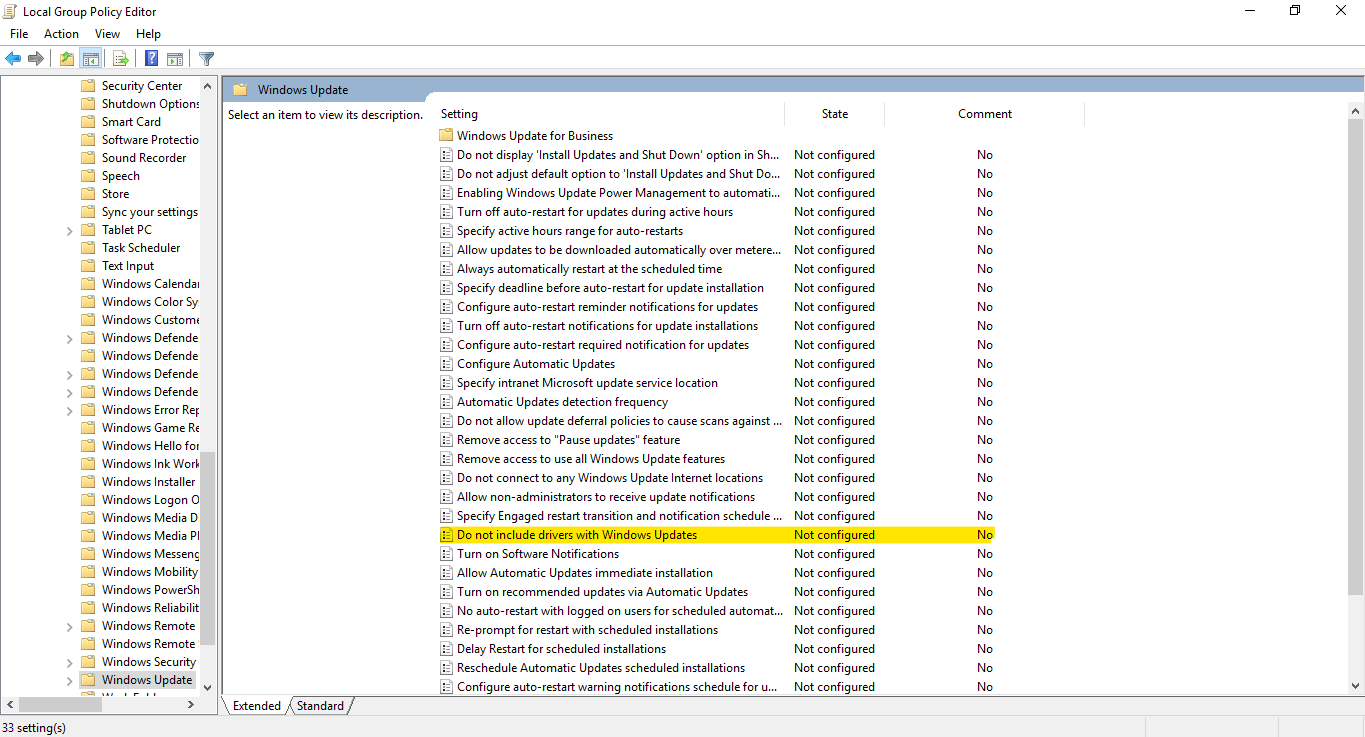
Stop updates for drivers with Windows Update using Group Policy

if you are using Windows 10 Pro, the easiest and quickest way to stop these updates is through using the Local Group Policy Editor.
Here are some steps:
1. Press Windows Key + R from the keyboard to open up Run command.
2. Type gpedit.msc and hit OK to open the Local Group Policy Editor.
3. Browse the following Path:
Computer Configuration > Administration Templates > Windows Components > Windows update

4. Open the right side, double-click the Don not include drivers with Windows Update policy.
5. Select the Enable option.

6. Click Apply and then OK.

After completing the steps, your device will continue to receive security and other patches, but drivers will be excluded.

Stop updates for drivers with Windows Update using Registry

If you are using Windows 10 Home then you won't have access to the Local Group Policy Editor, but you can still exclude driver updates by modifying the Registry with these steps:
Warning: This is a reminder that editing the Registry can cause irreversible damage to your installation if you don't do it correctly.
1. Press Windows Key + R from the keyboard to open up Run command.
2. Type regedit, and click OK to open the Registry.
3. Browse the following path:
HKEY_LOCAL_MACHINE > SOFTWARE > Policies > Microsoft > Windows
4. Right click on the windows folder and make a New key.

5. Name the key WindowsUpdate and press Enter.
6. Right-click the newly created key, select New and click on DWORD (32-bit) Value.

7. Name the key ExcludeWUDriversInQualityUpdate and press Enter.
8. Double-click the newly created DWORD and set the value from 0 to 1.

9. Click OK.

Once you have completed these steps, other updates will continue to download, but you won't receive updates for drivers.

At any time you can revert the changes using the same instructions, but on step No. 4, inside the WindowsUpdate (folder) key, make sure to right-click the ExcludeWUDriversInQualityUpdate DWORD and select the Delete option.